
Recipe Blog
Check our blog regularly for "how to" videos and seasonal recipes taken from the Dudwell School Cookbook, available to purchase here via Amazon.

December 2023
Christmas Tips
We hope that our blog posts below will have given you a few tips which will help you on and around Christmas Day, whatever you are able to do this year. For those who will be cooking a full roast lunch and Christmas pudding, we have a few final bits of advice which should make the prep and day much easier:
- Roast as many things as possible in aluminium foil containers, so that you can recycle them after the meal, rather get landed with lots of washing up. Put the container holding the turkey onto a baking sheet.
- Make and bake any stuffings in baking dishes – or at any rate, do not stuff the cavity of your turkey with them – the cavity does not necessarily get cooked all the way though and thus your stuffing may be contaminated by raw turkey.
- If you have problems getting your pudding to flame, add some caster sugar and a spot of gin or vodka to your brandy – heat carefully and take care as it could flame too much.
- Don’t worry too much about the gravy – you have plenty of time to make it. The turkey should rest for at least 20 minutes in a coolish oven. Pour all the juices into a glass bowl or jug, then using a bulb baster, carefully transfer all the lean juices into a saucepan. Make the gravy as you normally do – if it tastes at all insipid, Worcester sauce, balsamic vinegar and redcurrant jelly can be used to improve the flavour. Caroline adds turkey stock (made from the turkey giblets, but not the liver) and always pours half a bottle of red wine over the turkey about an hour or so before it is cooked to add more flavour to the finished gravy.
- If you can’t face basting the turkey, see if you can find some muslin. Soak it in melted butter and drape it over the turkey. Halfway through the cooking time (or when you can see that the turkey is nicely browned), cover the whole dish with aluminium foil.
- Don’t bother to cut a cross into the base of your sprouts – it only serves to make them a little soggy - and nobody likes soggy sprouts!
Wishing you all a safe and merry Christmas, and we hope to see some of you on our courses in 2024.

December 2023
Christmas Recipes: Roast Potatoes
We suggest cooking more of these lovely, crispy roast potatoes than you need - who can resist stealing another one after the meal, or having them as leftovers the next day?
Some tips: potatoes can be roasted at almost any temperature, usually taking 1 hour in a hot oven, or 1½ hours in a moderate one. They should be basted and turned over once or twice during cooking, and they are done when a skewer glides easily into them. Potatoes roasted in the same pan as the meat have the best flavour, but will not be as crisp as potatoes roasted separately in fat.
If you want to get ahead, the potatoes can be prepared to the end of stage 4 a day in advance. The water in which the potatoes were parboiled can be saved and used for making gravy, if no stock is available.
Maris Piper potatoes are the best for roasting.
Recipe
Serves 4 people
900g potatoes
Salt
4 tablespoons dripping, oil or goose fat
Method:
- Preheat the oven to 200C/400F, gas mark 6.
- Wash and peel the potatoes and, if they are large, cut them into 5cm/2in pieces.
- Bring them to the boil in salted water. Simmer for 10-15 minutes. Drain well, return to the pan and shake the potatoes to roughen their surfaces.
- Melt the dripping, oil or goose fat in a roasting pan and when hot add the potatoes, turning them so that they are coated all over. Take care if using goose fat - it can spit and may burn you. Season with salt and pepper.
- Roast, basting occasionally, and turning the potatoes over halfway through cooking.

December 2023
Christmas Recipes: Mince Pies
Once you've made your mincemeat as per the below recipe, you'll want to use it immediately to make these delicious mince pies.
Before you start, here are some tips for making pastry first!
The less you touch the pastry mix with your hands the better – everything should remain as cool as possible. Rubbing the fat and flour together coats the flour with fat, thereby hindering the development of gluten in the flour which would make it tough once baked. The pastry should also chilled before using in order to stop it shrinking, and to make sure the butter is firm.
Never be tempted to add extra liquid once the pastry has started coming together in large flakes - this will only make it tough, rather than lovely and crumbly. Conversely, if the dough is too dry, it will be hard to roll out so make sure everything is carefully measured.
If you want sweet pastry, just add 4 teaspoons of caster sugar to mix before you add the liquid.
Recipe
Makes approx. 20-24 pies
Ingredients:
For the rich shortcrust pastry:
340g plain flour
Pinch of salt
200g cold butter, cut into small pieces
2 medium egg yolks
4 tablespoons chilled water to mix
Filling:
500g mincemeat
To glaze:
Beaten egg
To serve:
Icing sugar
Method:
- Set the oven to 190C/375F, gas mark 5.
- Make the pastry:
- Put the flour with the salt into a large bowl.
- Add the butter and using 2 cutlery knives as though they are scissors, cut the butter into the flour. When the pieces are pea-sized, use the tips of your fingers to rub the flour and butter together until the mixture resembles coarse breadcrumbs. Shaking the bowl will bring the larger lumps of butter to the surface and there should be no visible lumps of butter. This stage can also be done in a Magimix, using the pulse button.
- Mix the egg yolks with the water and add to the flour mixture. Mix it in quickly using a cutlery knife – you should get large flakes of mixture coming together. Using the flat side of the knife, bring together the flakes and any remaining crumbs in the bowl – continue until there are no crumbs left.
- Draw the pastry together using your hands, shape it into a flat disc about 2cm thick. Shaping it like this initially will make the pastry easier to roll when you come to use it.
- Chill, wrapped in cling film in the refrigerator for 30 minutes before using. You can also freeze it at this stage for later use.
- For the mince pies:
- Divide the pastry in half – roll out half the pastry and use it to line the tartlet tins.
- Fill each tartlet tin with enough mincemeat to come three quarters of the way up the pastry.
- Roll out the remaining pastry and either cut into shapes such as stars (in which case, dampen lightly and press gently onto the mincemeat) or circles to fit the tarts as lids (dampen the pastry edges and press the tops down lightly to seal the edges well).
- Brush the tops with the beaten egg glaze and refrigerate the pies for 20 minutes before baking. This will prevent the pastry from shrinking.
- Snip the lids with scissors or a sharp knife to allow the steam to escape. Bake for 20 minutes until golden brown.
- Leave to cool on a wire rack, then serve dusted with icing sugar.

December 2023
Christmas Recipes: Mincemeat
Even though Christmas won't be as many of us had hoped it would be this year, we can still enjoy some delicious treats. We're starting off the Christmas blog with a recipe for mincemeat. It should be used relatively quickly after it's made, as it does not keep well – however, if you want to preserve it, omit the banana and then add it just before you use the mincemeat.
Recipe
Makes approx. 600g
Ingredients:
55g unsalted butter
1 small cooking apple washed and cored, grated skin and all
130g sultanas
130g raisins
50g blanched almonds, chopped
Finely grated zest of 1 lemon
Finely grated zest of 1 orange
½ tsp mixed spice
1 tablespoon brandy
80g soft dark brown sugar
1 small banana, peeled and chopped
Method:
Simply melt the butter and put into a bowl with the remaining ingredients. Mix well.
May 2020
"How To" - Macaroni Cheese
Watch as Caroline shows you how to make a delicious macaroni cheese in our Dudwell School kitchen:
March 2020
"How To" - Cheese Omelette
In our new video, Caroline shows you how to make the perfect cheese omelette at Dudwell:

October 2019
Tarte Tatin
Named after sisters Stephanie and Caroline Tatin who were hoteliers in Lamotte-Beuvron, France in the 1880s, the now-famous (and apparently accidentally created!) tarte Tatin is most associated with apples - but can also be made in savoury versions (we love caramelised red onion). This is an absolutely classic recipe and never fails to impress!
Recipe
Serves 8
You will need a 24cm heavy-based pan which can fit into the oven for this recipe.
For the pastry:
170g plain flour, sifted
Pinch of salt
55g ground rice or semolina
140g cold unsalted butter, cut into cubes
50g caster sugar
1 medium egg, beaten
For the filling:
1.5kg dessert apples
Finely grated zest of 1 lemon
100g unsalted or clarified butter
100g granulated sugar
Method:
-
Make the pastry: place the sifted flour into a large bowl, add the salt and ground rice.
-
Add the butter and rub into the flour until the mix resembles fine breadcrumbs. Stir in the sugar, then add enough egg to bind the dough together.
-
Shape into a disc, place between two sheets of baking parchment and gently roll into a circle a little larger than your frying pan. It should be approx. 5mm thick. Place in the fridge to rest.
-
Peel and core the apples and cut into neat quarters, then sprinkle with lemon zest.
-
Pre-heat the oven to 190C/375F, gas mark 5.
-
Melt the butter in the frying pan over a low heat. Add the sugar and cook gently until the sugar begins to melt and becomes toffee-coloured.
-
Arrange a first layer of apples, rounded side down, very neatly on top of the butter. The next layer of apples should be the other way up, so they fit neatly on top.
-
Allow the apples to cook over a very moderate heat - this may take up to 20 minutes. When the apple begins to cook, they will release some of their juice. This will mix with the caramel and it will take a little time before all the juices have become a rich brown colour. Agitate and move the pan to make sure the apples don't burn - you can lift them with a palette knife to check how brown the sauce is getting.
-
Remove from the heat and place the pan on a lipped baking sheet.
-
Take the pastry out of the fridge, remove one sheet of baking parchment and lay the pastry over the apples. Remove the second sheet of paper, and press the pastry down firmly on top of the apples. Remove any excess pastry.
-
Bake for 25-30 minutes until the pastry is golden brown.
-
Remove from the oven and allow to cool for 5 minutes. Place a lipped plate on top of the pan and very carefully turn them over together - the caramel will be very hot, so make sure your arm is protected.
-
Remove the pan, and serve warm.
September 2019
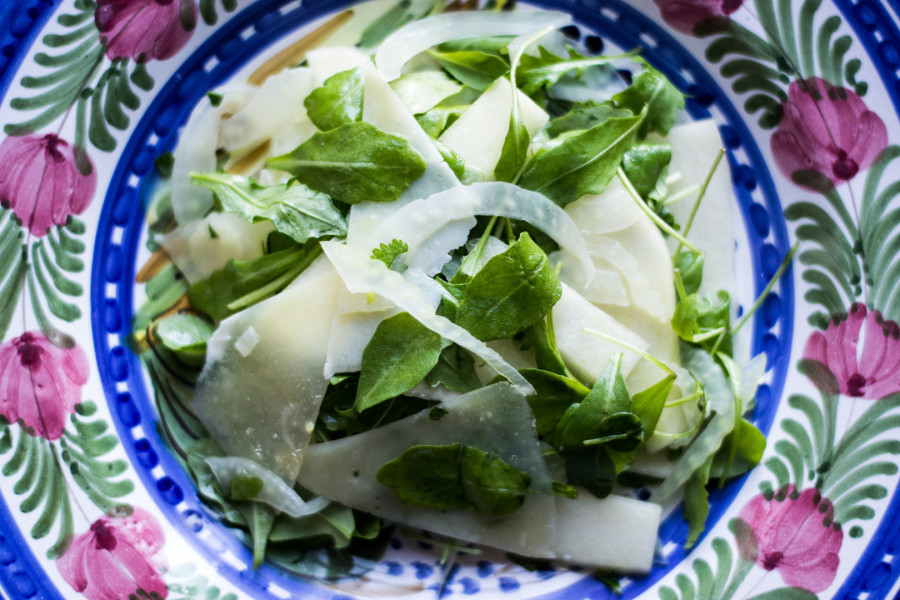
Pear, fennel and pecorino salad
With seasonal autumnal ingredients starting to make an appearance, this pear and fennel salad is perfect either as a light starter or lunch dish, or as a side to accompany a main course. You could even add toasted walnuts for some extra crunch, if you wish.
Recipe
Serves 2 as a starter, 4 as a side dish
Ingredients:
1 large fennel bulb, quartered cored and sliced very finely
1 tablespoon lemon juice
3 tablespoons extra virgin olive oil
3 teaspoons maple syrup
2 Conference pears, peeled, quartered and sliced
50g Pecorino cheese, finely shaved
35g rocket
2 tablespoons freshly chopped dill
Salt and freshly ground black pepper
Method:
-
Blanch the fennel in boiling salted water for 2 minutes. Drain and refresh under running cold water until completely cold. Pat dry with kitchen paper.
-
Mix together the lemon juice, oil and maple syrup. Add to the fennel, taste and season well – the lemon can make the dressing taste a little sour, so extra maple syrup may be necessary.
-
Add the Conference pears and make sure they are coated in the dressing. Add half of the dill and mix well. Add the cheese and mix in gently.
-
Scatter the rocket over the base of a serving dish, pile on the salad and scatter over the remaining dill.
August 2019
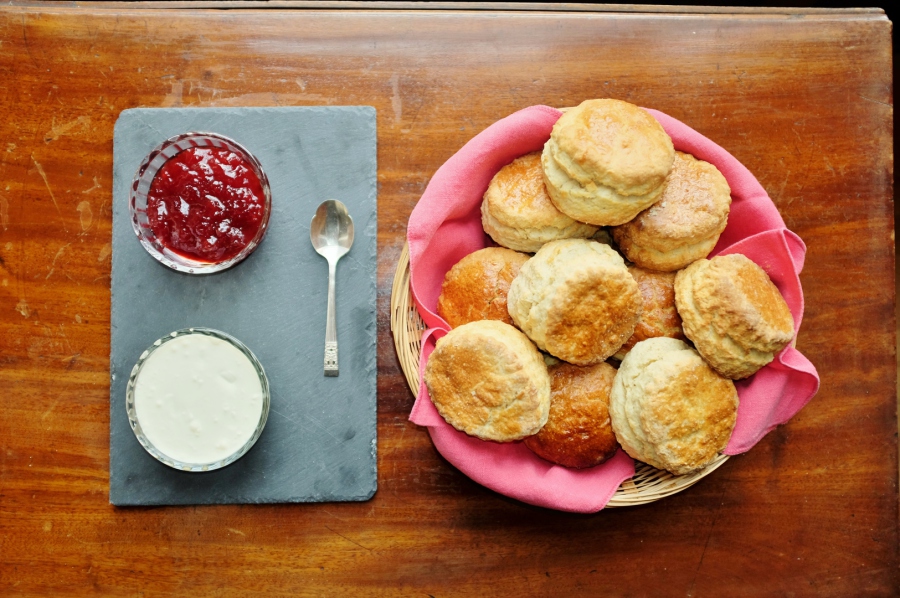
Scones
What could be nicer in the summer than a cream tea, with fresh scones, strawberry jam (if homemade, even better!) and clotted cream?
The only problem will be deciding whether the cream or jam should go on the scone first...
Recipe
Makes 8-10 large scones
Ingredients:
450g self-raising flour
Large pinch salt
110g cold salted butter,cut into cubes
60g caster sugar
250ml milk
1 egg, beaten, to glaze
To Serve:
Clotted cream
Strawberry jam
Method:
-
Preheat the oven to 220C/425F, gas mark 7. Flour a baking sheet.
-
Sift the flour with the salt into a large bowl.
-
Rub in the butter until the mixture resembles breadcrumbs. Stir in the sugar.
-
Make a deep well in the flour, pour in the milk and mix to a soft, spongy dough with a knife.
-
On a floured surface, knead the dough lightly until it is smooth. Roll out until about 2.5cm/1 in thick and stamp into rounds with a pastry cutter. Place on a floured baking sheet.
-
Brush the top of the scones with beaten egg.
-
Bake at the top of the oven for 20 minutes, or until well risen and brown. Leave to cool on a wire rack.
-
Serve with clotted cream and strawberry jam.
July 2019
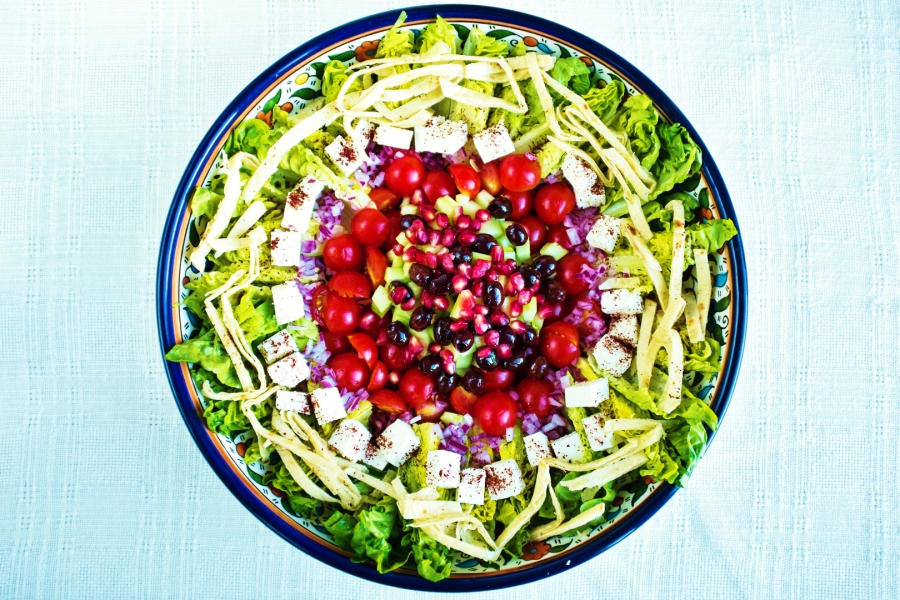
Fatoush
There are very many versions of fatoush, a pretty, summery salad which originates in the Middle East, but the essential ingredients are sumac and lemon juice. If you do find the dressing too sour, just add a little maple syrup.
Recipe
Serves 4 people as a main course, 6-8 people as a side salad
Ingredients:
2 small gem lettuces
2 pitta or 1 flatbread
1 tablespoon oil
1 cucumber, peeled, seeded and diced
½ red onion, finely chopped
1 tablespoon black olives, pitted
1x 200g packet feta cheese, crumbled
2 tablespoons pomegranate seeds
150g cherry tomatoes, halved
150g radishes, trimmed and quartered
For the dressing:
3 tablespoons olive oil
1 tablespoon lemon juice
1 tablespoon balsamic vinegar
Salt and freshly ground black pepper
To Serve:
1 tablespoon sumac
2 tablespoons Greek yogurt
Method:
-
Wash and dry the lettuce and cut into wedges.
-
Cut the pitta bread into quarters and fry in the oil until lightly crisped. Drain well on kitchen paper. If using flatbread, fry it for a minute on each side and then cut into smallish pieces.
-
Put the lettuces into a salad bowl with the cucumber, onion, olives, feta, pomegranate seeds, tomatoes and radishes.
-
Mix the ingredients together for the dressing and toss into the salad. Add the fried bread and serve with the sumac and Greek yogurt mixed together.
June 2019
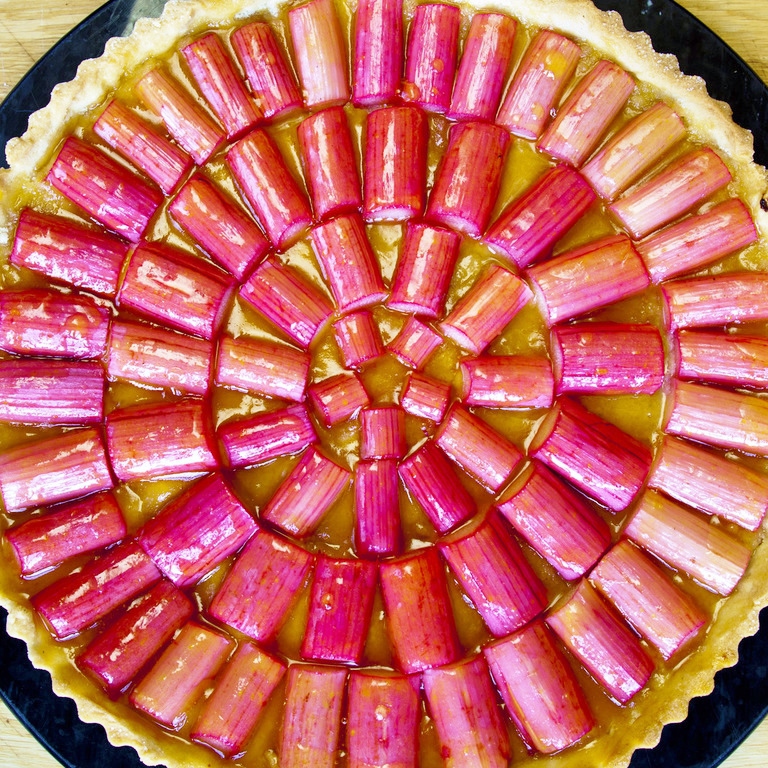
Rhubarb Tart
Rhubarb's prime season in the UK begins in April and comes to an end in June, and what better way to enjoy this tart ingredient than in a delicious rhubarb tart?
The pastry case can be made in advance and stored in an airtight container, while the almond and rhubarb filling is quick and easy to do on the day you want to serve this impressive tart and wow your dinner guests.
Recipe
Serves 6-8 people
Ingredients:
- Pastry
Butter for greasing
170g plain flour, sifted
40g icing sugar, sifted
140g unsalted butter, melted and slightly cooled
1/2 teaspoon vanilla extract
Finely grated zest of 2 lemons
Pinch of salt
- Almond base
50g blanched almonds
2 tablespoons granulated sugar
2 tablespoons plain flour
- Rhubarb filling
300g stems of rhubarb
25g granulated sugar
- Glaze
2 tablespoons apricot jam
1 tablespoon water
Method:
- Preheat the oven to 190C/375F, gas mark 5. Butter a 20cm flan ring.
- Make the pastry by mixing all the ingredients until they are thoroughly combined to a soft dough.
- Allow to cool in the refrigerator for half an hour or so.
- Set the ball of dough in the pan, and press and shape to fit, raising it around the sides of the pan (the pastry is too soft to roll out with a rolling pin). Use fingertips to ensure a thin crust, especially around the edges.
- Bake blind for 20 minutes (i.e. use a crumpled up circle of baking parchment on the base and fill the tart with enough baking beans to support the side of the pastry), then set aside to cool. You may store the baked pastry in an airtight container at this stage for a day.
- In a blender, grind the almonds, adding the sugar and flour to the blender after a few seconds.
- Pour the resulting dry mixture evenly over the tart base in the pan.
- Slice the rhubarb into very short lengths (approximately 1.25cm) and arrange in close concentric circles on the almond base. The amount of rhubarb needed to cover the base will depend on how slim the stems are.
- Sprinkle the sugar evenly over the rhubarb.
- Bake for around 25 minutes. The rhubarb should be cooked, but not dry or too dark (a slightly toasted colour looks nice, however, and means that the flavour of the rhubarb is fully released).
- Heat the apricot jam with the water and when well mixed, push through a sieve. Keep warm.
- Remove the tart from the oven and while it is still very hot, use a spoon or pastry brush to glaze the rhubarb lightly with the still-warm glaze.
May 2019
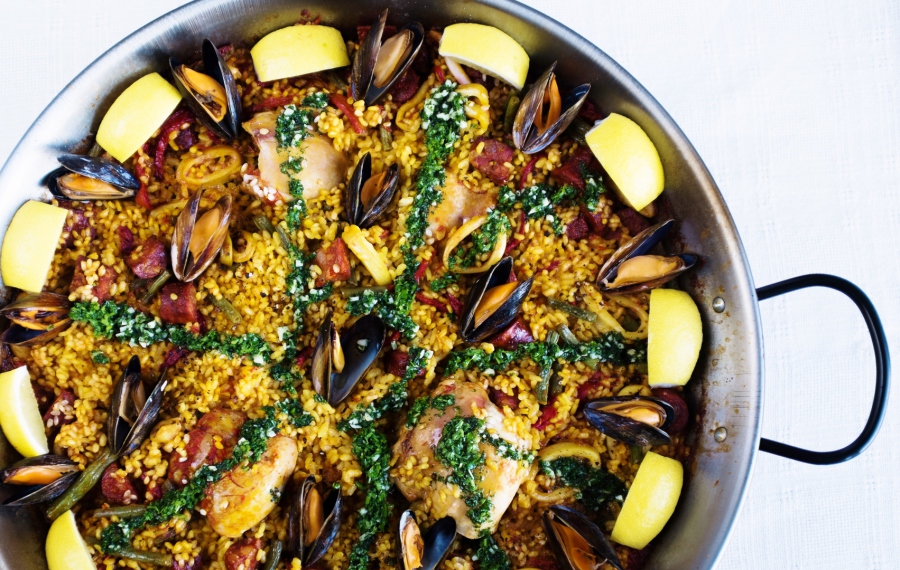
Paella
With the weather starting to improve, thoughts at Dudwell turn to summer dishes and evenings entertaining friends around the table.
Paella recipes are legion but this recipe, very slightly adapted from a recipe by Simon Hopkinson, is my favourite. It is essential to use Paella rice such as Calasparra - and remember, never stir a paella once the rice has been added!
Another key thing to remember is that before cooking with mussels, be sure that they are alive – tap any that are open and if they don’t close, they should be discarded. Also discard any that feel heavy compared to the other mussels. After cooking, if any mussels remain closed then discard these as well. If preferred, you can steam the mussels separately and then add them to the paella just before serving.
Finally, the amount of liquid called for is a little variable, as it depends on the size of your pan and the heat at which the paella is cooked – if you need extra liquid simply add some hot water.
Recipe
Serves 8 people
Ingredients:
150ml dry sherry
250g cherry tomatoes, halved
4 cloves garlic, peeled and chopped
1 teaspoon smoked Spanish paprika
2 tablespoons olive oil
200g Chorizo sausage, skinned and cut into small chunks
1 medium squid, cleaned and cut into rings
4 boneless chicken thighs, trimmed and cut in half
100g runner beans, stringed and sliced
150g sweet red peppers from a jar, sliced
1 teaspoon saffron threads, soaked in 2 tablespoons hot water
800ml chicken stock, hot
300g Paella rice
500g mussels, cleaned and de- bearded
Salt and freshly ground black pepper
To Finish:
3 cloves garlic, finely chopped
2 tablespoons freshly chopped curly parsley
4 tablespoons olive oil
Lemon wedges
Method:
- Liquidize together the sherry, tomatoes, garlic and paprika.
- Heat the oil in a paella pan add the chorizo and fry until the fat begins to run – remove with a slotted spoon to a plate. Add the squid and fry briefly. Remove to the same plate.
- Brown the chicken in the same pan until just brown.
- Add the sherry mixture to the pan with the chicken and bring up to a simmer. Cook for 5 minutes.
- Add the beans, peppers and saffron ‘tea’.
- Add the chorizo and squid and pour in the stock. Stir well and bring up to a simmer.
- Sprinkle the rice evenly into the pan. The paella should not be stirred once the rice has been added – the rice will stick a little at the bottom of the pan but is delicious – it is called "socorat".
- Season the paella with salt and freshly ground black pepper and cook over a medium heat – the rice can take anything from 12 to 25 minutes to cook, so taste it every so often to see.
- Preheat the oven to 360F/180C,gas mark 4.
- Prepare the finish – mix the garlic, parsley and oil together.
- When the rice is just cooked press the mussels, hinged side down, into the rice. Cover with tin foil and bake in the oven for 5 minutes or until all the mussels have opened.
- Drizzle the garlic, parsley and oil mixture over the paella and serve with lemon wedges.
April 2019
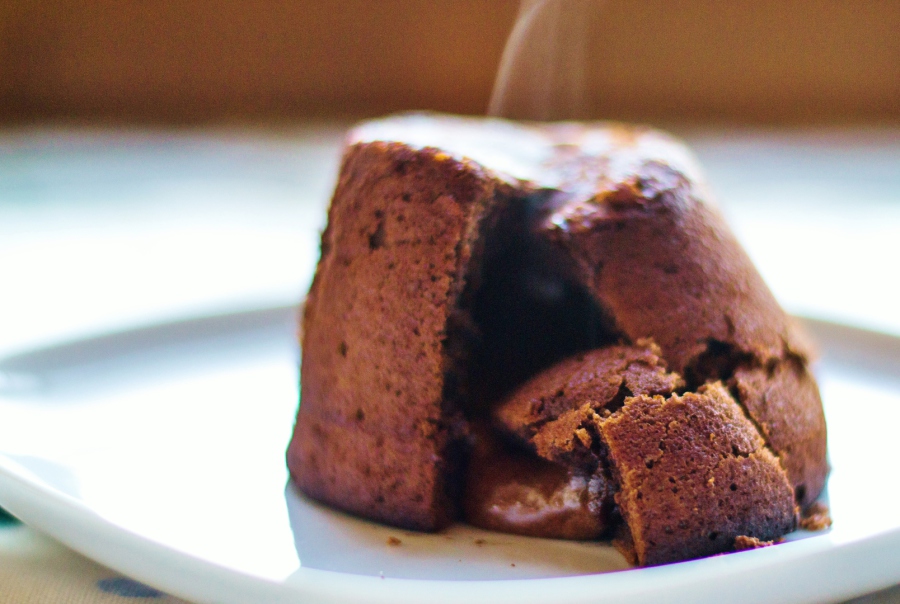
Chocolate Fondants
Easter means chocolate! We think this is a great recipe to try after a family meal, as the fondants are best prepared in advance and chilled at least 1 hour before baking. They can even be kept in the refrigerator for up to 24 hours in advance, making organisation a breeze.
This recipe makes 5 or 6 fondants (depending on the size of your dariole moulds), so if you are nervous about the cooking time you can always cook the extra in advance to test the exact time required for your oven.
Serve with clotted cream or vanilla ice cream.
Recipe
Makes 5-6 fondants, depending on size of moulds
Ingredients:
Melted butter
2 tablespoons cocoa powder
120g unsalted butter, cut into dice
120g dark chocolate, broken into pieces
2 eggs and 2 egg yolks (medium sized eggs)
120g caster sugar
3 tablespoons plain flour, sifted
To Serve:
Clotted cream or vanilla ice cream
Method:
- Brush the inside of 6 dariole moulds with the melted butter (brush the butter using upward strokes) and then put the cocoa in one and turn it to coat the inside, holding it over the second mould to catch any that escapes. Do the same with the other moulds. Place in the freezer until ready for use.
- Put the butter and chocolate into a heatproof bowl set over, but not touching, a pan of simmering water and stir occasionally until melted. Allow to cool slightly.
- Using a hand held electric whisk together the egg, yolk, sugar and a pinch of salt until pale and fluffy. Gently fold in the melted chocolate and butter, and then the flour. Pile into a large measuring jug and pour into the prepared moulds, stopping just short of the top. Leave to chill for 1 hour.
- Pre-heat the oven to 200C/400F, gas mark 6 and put a baking tray on the middle shelf.
- Put the fondants onto the prepared baking tray and cook for 12-15 minutes until the tops are set and coming away from the sides of the moulds. Leave to rest for 1-2 minutes and then turn out onto plates.
- Serve with clotted cream or vanilla ice cream.

March 2019
Pancakes
With Shrove Tuesday approaching, we have the perfect pancake recipe to ensure light and delicious pancakes for the whole family.
This recipe uses half milk and half water to make the batter to ensure a great result. You will also notice that we suggest refrigerating the batter for 30 minutes before cooking the pancakes - this is done so that the starch cells swell in the mix. When cooked, the cells burst and you get a very light pancake.
Pancakes should also be very thin - if you can toss a pancake it is probably too thick. Another point to note is that the first pancake in the batch is rarely perfect!
This batter may be made by hand in a mixing bowl, but can also be done in a blender or food processor - if you're using the latter method, the mixture can become too bubbly, so take care not to overwhizz.
Recipe
Makes about 12 pancakes
Ingredients:
120g plain flour
Pinch of salt
1 medium egg, beaten
1 medium egg yolk
300ml milk and water, mixed
1 tablespoon oil
To Serve:
Lemon wedges
Caster sugar
Method:
1. Sift the flour and salt into a mixing bowl, make a well in the centre exposing the bottom of the bowl.
2. Put the egg and egg yolk with a little of the milk and water into the well.
3. Using a wooden spoon mix the egg and milk and gradually draw in the flour from the sides as you mix.
4. When the mixture reaches the consistency of thick cream and the remaining milk and stir in the oil. The consistency should now be that of thin cream.
5. Cover the bowl and refrigerate for 30 minutes.
6. Heat a frying pan, or ideally a non-stick crepe pan. Add a little oil and then wipe out the pan – the idea is to use the oil to prevent the pancakes from sticking- pancakes are not fried.
7. Add enough batter to coat the bottom of the pan – swirl the pan to help the batter spread across the bottom of the pan.
8. Place over a medium heat and, when the pancake is lightly brown on the underside turn it over using a palette knife or your fingers and cook the other side until lightly browned.
9. Make up all the pancakes, turn them out onto a plate and keep them separated with squares of greaseproof paper.
10. Serve with lemon wedges and plenty of caster sugar.
January 2019
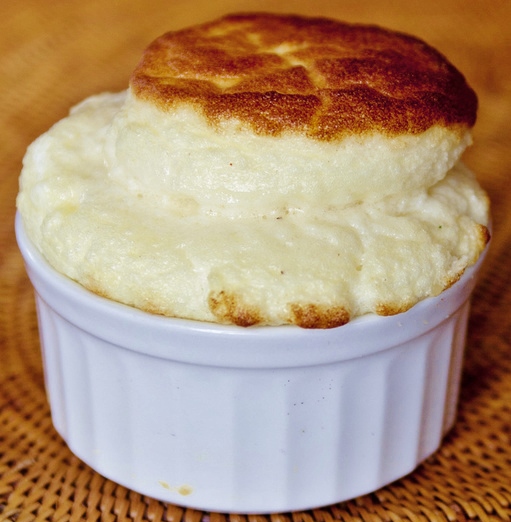
Cheese Soufflé
Many people can be reluctant to make soufflés at home, believing them to be too difficult for home cooks to achieve good results.
We think our recipe is almost foolproof - and individual soufflés using this recipe can even be made ahead in advance then frozen, to lessen the burden on the day of your dinner party or kitchen supper. If you plan to do this, we suggest cooking from frozen for 12-15 minutes (instead of the 8-10 minutes needed usually) - a test run in your own oven to check temperature will also give you peace of mind.
We also think this is one of the best ways to use up any leftover cheese you may have in the fridge after Christmas! Serve with a fresh green salad.
Recipe
Serves 2-3 as a main course, or 4-6 as a first course
Ingredients:
Melted butter for greasing
Dried white breadcrumbs
35g butter
30g flour
1/2 teaspoon dry English mustard powder
Pinch of cayenne pepper
280ml milk
100g strong Cheddar (or other strong cheese), finely grated
4 medium eggs, separated
Salt and freshly ground pepper
This can be made using 4 large-ish, or 6 smaller ramekins, or a 1 x 15cm soufflé dish.
Method:
- Preheat the oven to 200C/400F, gas mark 6. Place a baking sheet on the top shelf in the oven (NB, make sure there is enough space for the soufflé to rise).
- Brush the soufflé dish or ramekins with melted butter and dust with the breadcrumbs.
- Melt the 35g butter in a saucepan, add the flour, cayenne pepper and mustard powder, mix well and cook over a gentle heat for 45 seconds.
- Remove from the heat and gradually add about half the milk, stirring continually. When the mixture is smooth, return to the heat and bring slowly back up to the boil, stirring all the time and adding the remaining milk. Boil for one minute. The mixture will get thick and leave the sides of the pan.
- Remove from the heat and add the grated cheese. Pile into a mixing bowl and when slightly cooled, add the egg yolks and season with salt and pepper. It should be very well seasoned - the flavour will be diluted by the addition of the egg whites.
- Whisk the egg whites until stiff but not dry. Beat a spoonful of the egg whites into the soufflé base. This is to "loosen" the mixture and makes the folding-in of the whites simpler than it otherwise would be. Fold in the remaining whites and pile into the soufflé dishes or ramekins. If using a soufflé dish it should be just over three-quarters full - if using ramekins, they should be full. Run your finger around the top of the mixture. This will give a "top hat" appearance to the cooked soufflé. Tap the dish lightly on the work surface to remove any pockets of air.
- Bake in the oven on the pre-heated baking sheet for 25-30 minutes for a large soufflé, or 8-10 minutes for individual soufflés. Serve immediately (do not test to see if the soufflé is cooked until at least two thirds of the way through the cooking time, then give the dish a light shove - if it wobbles alarmingly, cook for a further 5 minutes).
Dudwell School Ltd, Dudwell Lane, Chewton Mendip, Bath, Somerset BA3 4ND Ι Tel: 07860 123827
www.dudwellschool.com Ι bookings@dudwellschool.com Ι Company Number 0776954